


Edge Computing with TinyAutomator in Industrial Applications
Things used in this project
Hardware components
Raspberry PLC CPU - Configurable. × 1
Power supply (12-24V and > 1.5A) × 1
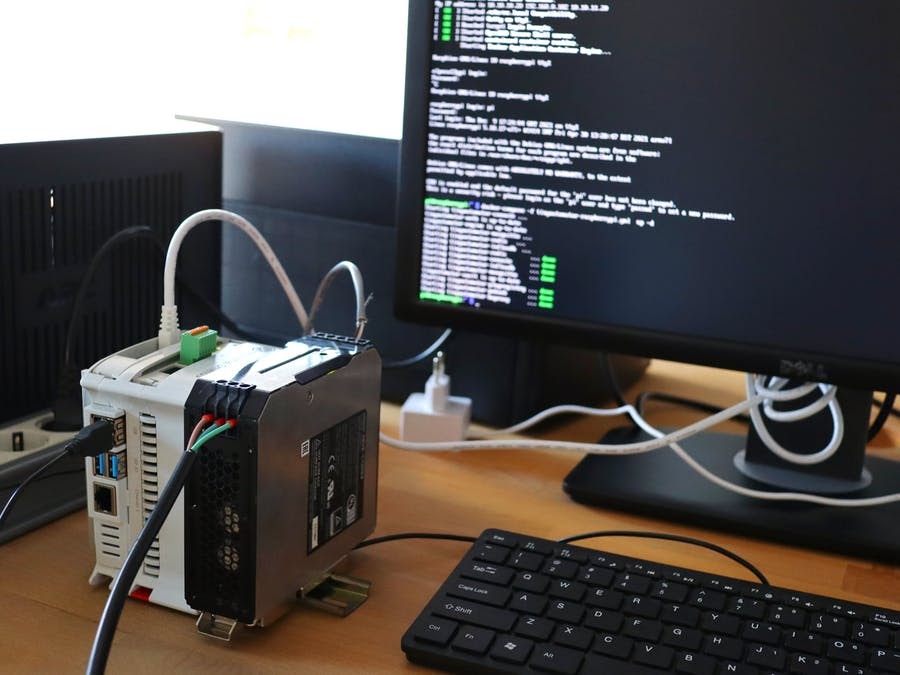
HDMI monitor and USB keyboard × 1
Software apps and online services
Hand tools and fabrication machines

Wire Stripper / Crimper,
10AWG - 20AWG Strip

Wire Stripper & Cutter,
18-10 AWG / 0.75-4mm² Capacity Wires
Motivation
📡 The Internet of Things has become the backbone of automation and with all the benefits we are also getting to its shortcomings as well. The burden of reading off raw data from devices just to push them to the cloud to apply the logic and then trigger the appropriate response back can be mitigated by developing the logic locally from the start. But this also becomes cumbersome once you want to deploy multiple instances or update them in real-time with ease.
🦉 TinyAutomator is here to help by providing a solution for Edge Computing that is easy to deploy and update for multiple instances and act both as a direct control loop locally or as a gateway for filtered data that is pushed towards the cloud.
🏭 Industry 4.0 proposed increasing interconnectivity and smart automation for the industrial and after 2000 this became the main focus of many factories to gain better insight into their activity and efficiency.
Features and benefits of TinyAutomator

Waylay TinyAutomator community edition comes free of charge and provides the following features:
- Console, inference engine, resource service
- Serverless sandbox
This means you will have locally a full-stack capable of ingesting data through REST API or MQTT, whichever works best for you, then setting rules via the low-code interface with ease and changing them on the fly if needed while triggering actuators based on said business logic with the data received from the sensors.
Hardware 🪛
Developing hardware for the industrial environment comes with its own set of challenges and constraints. Usually, industrial hardware runs at 24V and is DIN-rail compatible as it should be deployed inside an electronic cabinet.
Our pick of development boards is the Industrial Shields 012002000200, an RPI4B based industrial PLC with 2GB of RAM and with a 32GB SD card, meeting the recommended requirements for running TinyAutomator. Alongside the development board, we have used an Omron 24V power supply, to ensure a steady voltage to our system.
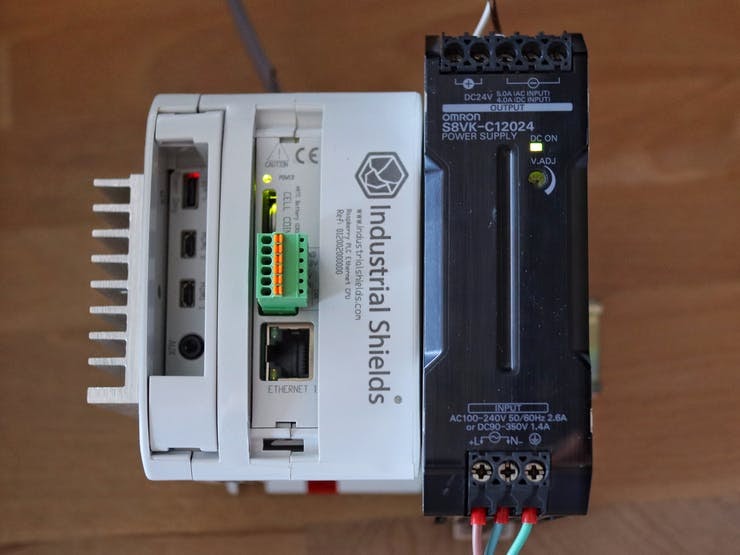
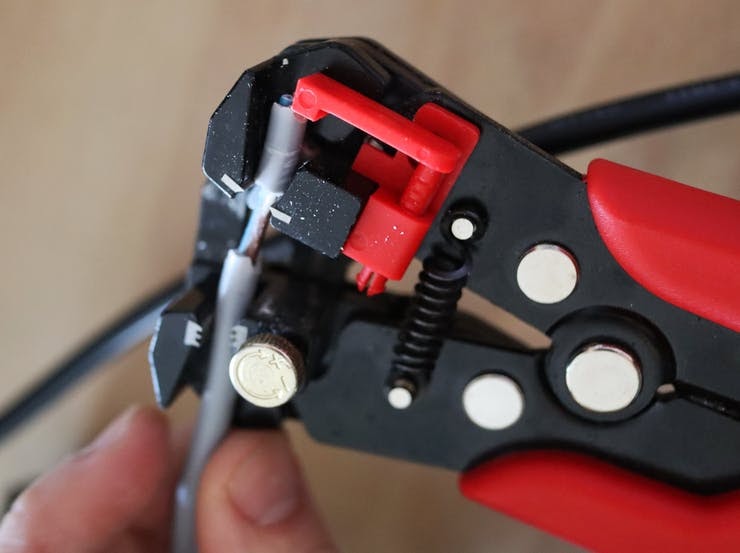
To deploy such a system inside an industrial facility, you need a few specialized tools like a crimping tool, a wire stripping tool and ferrules. By using those tools, we have created jumpers used for powering the development board from the Omron power supply.

Wire connections
For the purpose of this tutorial we only connected the Industrial power supply to the AC power plug and the output of it (24V) to the Industrial Shields RPI4B PLC.
Installing TinyAutomator on the Device
1. Setup the PLC and gain SSH Access
Start by supplying power to the PLC and connecting an HDMI monitor to one of the available video plugs. Plug a USB keyboard as well and wait for the OS to boot.
Provide an Internet connection by either Ethernet or WiFi to gain SSH access to the PLC for the next following steps.
First, update and upgrade the OS:
sudo apt-get update
sudo apt-get upgrade
⚠️ If you get the following error:

Then run:
sudo apt-get update --allow-releaseinfo-change
sudo apt-get upgrade
Reboot the device:
sudo reboot
2. Install TinyAutomator
Install the required packages (docker and docker-compose) by following these steps in the UNIX shell:
curl -fsSL https://get.docker.com -o get-docker.sh
sudo sh get-docker.sh
sudo usermod $USER -aG docker
exit
<login again to raspberry pi console>
sudo apt-get install -y libffi-dev libssl-dev libnss3-tools
sudo apt install -y python3-dev python3 python3-pip
sudo pip3 install docker-compose
echo "deb http://ftp.de.debian.org/debian sid main" | sudo tee -a /etc/apt/sources.list
sudo apt-key adv --keyserver keyserver.ubuntu.com --recv-keys 648ACFD622F3D138
sudo apt update
sudo apt install -y libseccomp2
sudo sed -i '$ d' /etc/apt/sources.list
sudo apt update
sudo dphys-swapfile setup
sudo dphys-swapfile swapon
Open the file named /etc/hosts using the text editor of your choice (ours is nano):
sudo nano /etc/hosts
And add standalone.waylay.io and pubsub-standalone.waylay.io to the localhost line:
127.0.0.1 localhost standalone.waylay.io
Now your system is ready to run a Waylay standalone platform. Download the TinyAutomator docker-compose file for the ARM platform:
wget -O tinyautomator-raspberrypi.yml https://tinyurl.com/waylay-fulltinyautomator
Start docker-compose with the downloaded file. This will start downloading and will eventually run the docker images with the Waylay platform services and open some ports to access those services.
ℹ️ Can take some time to download the docker images:
docker-compose -f tinyautomator-raspberrypi.yml up -d
⚠️ If the ssh connection gets stuck while downloading the docker images, run the sudo reboot command directly from the device and re-run the previous command.
The standalone Waylay engine uses the fake DNS names standalone.waylay.io and pubsub-standalone.waylay.io. In order to access it, adjust the /etc/hosts file on your local PC where you will run a browser to access the Waylay Console with a standalone.waylay.io hostname that will be translated to the IP address of your Raspberry Pi PLC.
You can check the IP address of your device by executing the ip a command on your Raspberry Pi PLC and finding the IP address assigned to the network interface.
E.g.:
sudo nano /etc/hosts
And add:
192.168.0.223 standalone.waylay.io pubsub-standalone.waylay.io
3. Access the Waylay TinyAutomator services
After finishing the previous steps you should be able to access the Waylay Console by opening the URL.
ℹ️ The Waylay Console is using the HTTPS protocol to connect to the engine’s REST endpoint. For the purpose of this tutorial, you can just accept that certificate and continue with the next section of the tutorial (Data ingestion via MQTT broker).

If you want to set up the certificate for the HTTPS protocol, you have to import the server.pem file which was generated by the haproxy docker container into your browser. You can check the content of that certificate by looking into haproxy container logs. The HAProxy container is named tinyautomator-haproxy.
Example of getting the certificate:
docker logs tinyautomator-haproxy
And copy/paste the text which starts with the line -----BEGIN PRIVATE KEY----- and ends with -----END CERTIFICATE----- to the file on your local computer (give it some name, like standalone.server.pem) and upload it into your browser.
You can check how to do this by asking Google (an example for Chrome browsers). For installation on Mac, you can do the steps described here to import the certificate.
Also, you can access the Waylay Engine’s REST endpoint using the following URL https://standalone.waylay.io/api/ (or without HTTPS on http://standalone.waylay.io/api/).
Data ingestion via MQTT broker
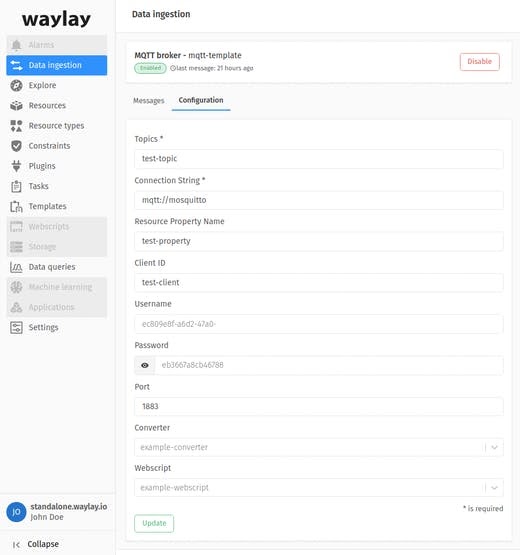
TinyAutomator includes a simple lightweight MQTT service that you can use for data ingestion. You should start by configuring the MQTT connector on standalone.waylay.io. Go to Data ingestion -> MQTT broker -> Add integration and fill in the fields:
Now install MQTT tools on your local PC:
sudo apt install mosquitto-clients
and run the following command to subscribe to all channels (adjust the ip accordingly):
mosquitto_sub -h 192.168.1.1 -p 1883 -t '#'
Now run the following command to send data to test-topic (adjust the ip and the topic name):
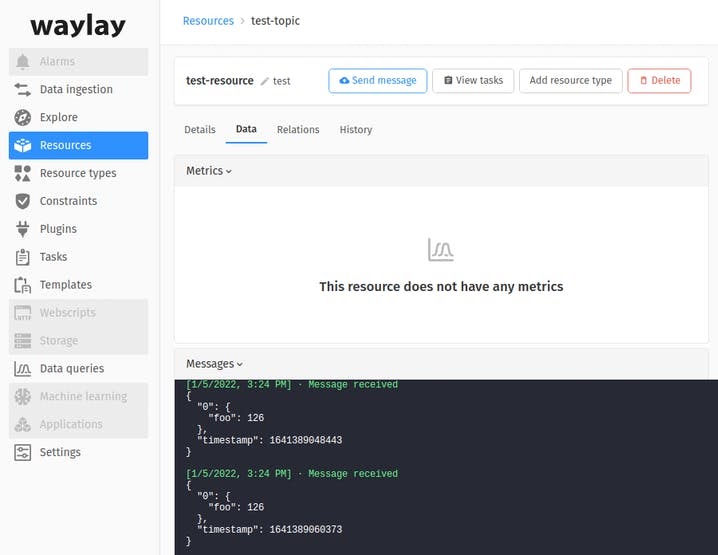
mosquitto_pub -h 192.168.1.1 -p 1883 -t test-topic -m '[{"foo":126 }]'
You should see the data on standalone.waylay.io at Data ingestion -> MQTT broker -> Messages:

You should see that a resource with id test-topic is created on the Waylay Console and if you go to the Messages tab of that resource you should see the incoming message and timeseries data. You can rename your resource if you wish.
What’s next?
Now that you have a PLC running the TinyAutomator stack you can follow up our next tutorials for some real-world use cases or build your own automation based on them:
If you need help in deploying this solution or building something similar please contact Waylay.io for the low-code IoT Solution or Zalmotek.com for IoT-enabled hardware prototypes.


'%3e%3cg id='Final-Copy-2_2_' transform='translate(1275.000000, 200.000000)'%3e%3cpath class='st0' d='M7.4,12.8h6.8l3.1-11.6H7.4C4.2,1.2,1.6,3.8,1.6,7S4.2,12.8,7.4,12.8z'/%3e%3c/g%3e%3c/g%3e%3c/g%3e%3cg id='final---dec.11-2020'%3e%3cg id='_x30_208-our-toggle' transform='translate(-1275.000000, -200.000000)'%3e%3cg id='Final-Copy-2' transform='translate(1275.000000, 200.000000)'%3e%3cpath class='st1' d='M22.6,0H7.4c-3.9,0-7,3.1-7,7s3.1,7,7,7h15.2c3.9,0,7-3.1,7-7S26.4,0,22.6,0z M1.6,7c0-3.2,2.6-5.8,5.8-5.8 h9.9l-3.1,11.6H7.4C4.2,12.8,1.6,10.2,1.6,7z'/%3e%3cpath id='x' class='st2' d='M24.6,4c0.2,0.2,0.2,0.6,0,0.8l0,0L22.5,7l2.2,2.2c0.2,0.2,0.2,0.6,0,0.8c-0.2,0.2-0.6,0.2-0.8,0 l0,0l-2.2-2.2L19.5,10c-0.2,0.2-0.6,0.2-0.8,0c-0.2-0.2-0.2-0.6,0-0.8l0,0L20.8,7l-2.2-2.2c-0.2-0.2-0.2-0.6,0-0.8 c0.2-0.2,0.6-0.2,0.8,0l0,0l2.2,2.2L23.8,4C24,3.8,24.4,3.8,24.6,4z'/%3e%3cpath id='y' class='st3' d='M12.7,4.1c0.2,0.2,0.3,0.6,0.1,0.8l0,0L8.6,9.8C8.5,9.9,8.4,10,8.3,10c-0.2,0.1-0.5,0.1-0.7-0.1l0,0 L5.4,7.7c-0.2-0.2-0.2-0.6,0-0.8c0.2-0.2,0.6-0.2,0.8,0l0,0L8,8.6l3.8-4.5C12,3.9,12.4,3.9,12.7,4.1z'/%3e%3c/g%3e%3c/g%3e%3c/g%3e%3c/g%3e%3c/svg%3e) Privacy Choices
Privacy Choices