
Items utilized in this project
Hardware components:
- Raspberry Pi 4 Model B
- Raspberry Pi camera module V2
- PIR motion sensor (generic)
- Jumper wires (generic)
- LED (generic)
- Resistor 220 ohm
Software apps and online services:
- Waylay TinyAutomator
- TensorFlow
PART I: THE STORY
Intro
Nowadays, video surveillance is present in a lot of places, even at home. You can buy an indoor security camera, which streams a live video feed right to your phone, and sends an alert to your phone if there’s any movement detected. The problem with these is that cameras can’t detect what caused the movement. For example, a cat can trigger movement detection. If you want a device which can classify the moving object, you’ll be paying a lot more.
But what if you could use a cheap webcam, motion sensor and a small cheap computer (or edge device if you will), to create your own intrusion detection system? First, we’d like to detect movement. If there is any, a picture gets taken. This picture then gets analyzed. So, if it’s your cat that triggered the alarm, it won’t alert you.
Goal
Use a Raspberry Pi, camera module and PIR motion sensor to capture images and detect objects; then send the images with the detected intruder to a messaging application.
Solution
First, we have to take pictures when movement is detected. To make use of the PIR (passive infrared) motion sensor to detect movement, we’ll use the module gpiozero in a small python script. After that, a picture gets taken with the fswebcam utility in that same script. At last, the application sends an MQTT message to the TinyAutomator Mosquitto MQTT server with the filename of the picture. This application (together with TinyAutomator) will run in a docker container and the images will be saved to a docker volume so they can be accessed by TinyAutomator.
Second, we need to have an object detection service. For this, we’ll use a JavaScript library called TensorFlow.js to deploy the model COCO-SSD. This model has 80 different classes, which can detect objects. It takes an image as an input and gives back the bounding boxes of the detected object as well as the confidence rating of the detection.
At last, we have to create a couple of Waylay sensors to use the model and send the message using a template in TinyAutomator.

Hardware setup
1) Connect the camera module to the ribbon connector:

2) Connect the PIR sensor using a couple jumper wires like below:
- PIR sensor: VCC to 5V, GND to GND and signal to GPIO 17
- LED: anode to GPIO18 and cathode to GND

PART II: SOFTWARE SETUP
Installing TinyAutomator on the Raspberry Pi
The installation guide describes all the steps needed to install TinyAutomator on a Raspberry Pi. After the installation, you should be able to access the Waylay TinyAutomator web console.

Here, we’ll process and send the images.
Installing the object detection model
First, we’ll install the object detection model files to the TinyAutomator plugins folder. To install this, you have to run these six commands:
sudo mkdir /var/lib/docker/volumes/tinyautomator-plugins/_data/coco-ssd
sudo wget -O /var/lib/docker/volumes/tinyautomator-plugins/_data/coco-ssd/model.json https://storage.googleapis.com/tfjs-models/savedmodel/ssdlite_mobilenet_v2/model.json
sudo wget -O /var/lib/docker/volumes/tinyautomator-plugins/_data/coco-ssd/group1-shard1of5 https://storage.googleapis.com/tfjs-models/savedmodel/ssdlite_mobilenet_v2/group1-shard1of5
sudo wget -O /var/lib/docker/volumes/tinyautomator-plugins/_data/coco-ssd/group1-shard2of5 https://storage.googleapis.com/tfjs-models/savedmodel/ssdlite_mobilenet_v2/group1-shard2of5
sudo wget -O /var/lib/docker/volumes/tinyautomator-plugins/_data/coco-ssd/group1-shard3of5 https://storage.googleapis.com/tfjs-models/savedmodel/ssdlite_mobilenet_v2/group1-shard3of5
sudo wget -O /var/lib/docker/volumes/tinyautomator-plugins/_data/coco-ssd/group1-shard4of5 https://storage.googleapis.com/tfjs-models/savedmodel/ssdlite_mobilenet_v2/group1-shard4of5
sudo wget -O /var/lib/docker/volumes/tinyautomator-plugins/_data/coco-ssd/group1-shard5of5 https://storage.googleapis.com/tfjs-models/savedmodel/ssdlite_mobilenet_v2/group1-shard5of5
Creating the motion detection/image capturing container
This is the python script that takes a picture every time movement is detected and sends an MQTT message to the MQTT broker of TinyAutomator:
from gpiozero import MotionSensor
import time
from gpiozero import LED
import paho.mqtt.client as paho
import os
broker = os.environ.get(“HOST”)
port = int(os.environ.get(“PORT”))
pir = MotionSensor(17)
led = LED(18)
def on_publish(client,userdata,result):
print(“data published \n”)
pass
client1 = paho.Client(“control1”)
client1.on_publish = on_publish
client1.connect(broker,port)
client1.loop_start()
def Motion():
led.on()
filename=str(time.time())
delete = “find “+ os.environ.get(“FILES”) +” -name \”*.jpg\” -mtime 1 -exec rm -rf {} \;”
os.system(delete)
command = “fswebcam -r 1920x1080 --no-banner {path}/{filename}.jpg”.format(path=os.environ.get(“FILES”),filename=filename)
data = ‘{“resource”:”Motionsensor1”,”image”:”‘+filename+’.jpg”,”presence”:’+str(pir.value)+’}’
os.system(command)
ret = client1.publish(“Sensors”,data)
def noMotion():
led.off()
data = ‘{“resource”:”Motionsensor1”,”presence”:’+str(pir.value)+’}’
ret = client1.publish(“Sensors”,data)
pir.when_motion = Motion
pir.when_no_motion = noMotion
while True:
pir.wait_for_motion()
pir.wait_for_no_motion()
As you can see, the script only sends the filename and state of the motion sensor. The actual image remains local, which is more secure.
Create a file called PIR.py in your project folder (the same folder where you downloaded the tinyautomator-raspberrypi.yml file) and paste the code above in that file.
To run this script in a Docker container, we’ll have to create a Docker image:
FROM debian:bullseye-slim
RUN apt-get update && \
apt-get install -y --no-install-recommends fswebcam
RUN apt-get update && \
apt-get install -y libc-bin && \
apt-get -y install python3 python3-pip || true && \
dpkg --purge --force-all libc-bin && \
rm -rf /var/lib/apt/lists/*
RUN pip3 install gpiozero paho-mqtt RPIO pigpio RPi.GPIO lgpio
COPY PIR.py /
CMD [“python3”,”/PIR.py”]
To use this image, you don’t have to do anything yourself, as this will automatically be done in the next step.
Creating the Docker compose file for the python script
Docker compose is a tool for defining and running multi-container Docker applications. To configure the application’s services, you use YAML files. This can be done in a single YAML file, but also with multiple files. Here, we’ll use multiple files, as TinyAutomator has its own YAML file, which you should’ve downloaded already. To run the extra container for our python script, we’ll configure a separate file, as this is a separate add-on to TinyAutomator.
This is the YAML file to run the container for the python script (with some launch options that point to TinyAutomator MQTT service):
version: ‘3.4’
volumes:
images:
name: images
services:
sensor-demo:
image: marcelisrafilov/motion-detection:latest
container_name: sensor-demo
environment:
- HOST=mosquitto
- PORT=1883
- FILES=/images
restart: always
privileged: true
volumes:
- images:/images
Create a file called sensor-demo.yml and paste this code in it.
That’s it for the software setup! Now you just need to restart TinyAutomator and start the python script in a docker container:
docker-compose -f sensor-demo.yml -f tinyautomator-raspberrypi.yml up -d
PART III. WORKING WITH TINYAUTOMATOR
Now that TinyAutomator is up and running we can use the Waylay web console to process the given images and send them to wherever we want.
Creating plugins
In-depth information about plugins can be found on Waylay Docs.
To implement object detection in our template later on we have to create our own plugins in TinyAutomator. We need three custom plugins:
- Object detection
- Marking the detected intruders
- Posting the file to Slack/Discord
Object detection
This plugin has one required input, namely the image you want to do object detection on. You can also give the file location of the model you’ll use (in our case coco-ssd). This can be skipped, but then the plugin will look for the model online, which will take more time. As a third argument you can give the imageURL to send the image to an external application. But in this project, we won’t use this functionality.
This is the code of the plugin:
const axios = require(‘axios’);
const fs = require(‘fs-extra’);
const cocoSsd = require(‘@tensorflow-models/coco-ssd’);
// tslint:disable-next-line: no-floating-promises
const { modelfile,imagefile, imageurl } = options.requiredProperties
function base64_encode(file) {
// read binary data
var bitmap = fs.readFileSync(file);
// convert binary data to base64 encoded string
return new Buffer(bitmap).toString(‘base64’);
}
async function execute () {
let model;
try {
// Load the model
const config={}
if(modelfile){
config.modelUrl=modelfile
}
model = await cocoSsd.load(config);
const data = fs.readFileSync(imagefile);
let classifyRes={};
let state=‘classified’
let imgTensor = tfnode.tidy( () => {
try{
return tfnode.node.decodeImage(data, 3);
} catch (error) {
console.error(error)
return undefined;
}
})
if(imgTensor){
classifyRes = await model.detect(imgTensor)
await model.dispose();
tfnode.dispose(imgTensor)
}else{
state=‘error’
}
const classificationResult={};
let value = {
observedState: state,
rawData: {
result: classifyRes,
}
};
if(imageurl){
try {
const method=‘POST’;
const modifiedResult={“bounding_boxes”:[]}
for (key in classifyRes) {
const box={
“label”:classifyRes[key].class,
“value”:classifyRes[key].score,
“x”:Math.trunc(classifyRes[key].bbox[0]),
“y”:Math.trunc(classifyRes[key].bbox[1]),
“width”:Math.trunc(classifyRes[key].bbox[2]),
“height”:Math.trunc(classifyRes[key].bbox[3])
}
modifiedResult.bounding_boxes.push(box)
};
console.log(modifiedResult)
const imgdataOriginal=‘data:image/png;base64, ‘+base64_encode(imagefile);
const body={
“img”: imgdataOriginal,
“imgoriginal”:imgdataOriginal,
“classificationResult”:modifiedResult
}
const response = await axios({ url: imageurl, data: body, method: method, timeout: 2000 })
value.rawData.httpSend = {
status: response.status
}
} catch (error) {
console.error(error)
value.rawData.httpSend = {
error: error
}
}
}
send(null, value);
} catch (error) {
console.error(error)
send(null, { observedState: ‘error’, rawData: { errorMessage: ‘Failed to call url: ‘ + error } })
} finally {
if(model){
await model.dispose();
}
}
}
execute()
You could add and configure this plugin yourself, but instead, you can just first download the plugin and then use the upload functionality in TinyAutomator.

Great! Now we can move on to marking our detected objects.
Marking detected objects
After the image has been classified, we want to send it to Slack. But just sending the original image is boring, having the intruder marked on the image with a label is cooler, it becomes like a real security image.


1 / 2
To do this we'll just use the output of the object detection model. This includes the detected class and bounding boxes.
This plugin takes 2 arguments:
- The file location of the original image which was analyzed
- The returned bounding boxes (from the object detection)
/*
* ⚠️ Plugins should never throw exceptions, instead send an error back.
*
* ref: https://nodejs.org/api/errors.html#errors_error_first_callbacks
*/
const sharp = require('sharp');
const fileName = options.requiredProperties.fileName;
const jsonBoxes = options.requiredProperties.jsonBoxes;
const MAX_WIDTH = 1920;
const MAX_HEIGHT = 1080;
if (!fileName || !jsonBoxes) {
send(new Error('Missing property: fileName or jsonBoxes'));
}
const dir = fileName.substring(0,fileName.lastIndexOf("/"))
let state = "success"
const finalFileName = fileName.substring(0,fileName.lastIndexOf("."))+".markedImage.jpg";
const rectanglePrefix=fileName.substring(0,fileName.lastIndexOf("."))+".rectangle";
const images = new Array();
async function createRectangle(x, y, width, height, text, idx) {
try {
const svgImage = `
<svg width="${width}" height="${height}">
<style>
.title { fill: #ff0000; font-size: 30px; font-weight: normal;}
</style>
<text x="15" y="30" text-anchor="left" class="title">${text}</text>
</svg>
`;
await sharp(Buffer.from(svgImage))
.extract({
left: 5,
top: 5,
width: Math.floor(width)-10,
height: Math.floor(height)-10
})
.extend({
top: 5,
bottom: 5,
left: 5,
right: 5,
background: 'red'
})
.toFile(`${rectanglePrefix}${idx}.png`);
} catch (error) {
console.log(error);
}
}
async function composite(images,finalImage) {
try {
await sharp(fileName)
.composite(images)
.toFile(finalImage);
} catch (error) {
console.log(error);
}
}
async function execute(){
const json = JSON.parse(jsonBoxes);
for (const [idx,obj] of json.entries()){
const y = Math.floor(obj.bbox[0])
const x = Math.floor(obj.bbox[1])
let width = Math.floor(obj.bbox[2])
if(width>MAX_WIDTH){
width = MAX_WIDTH
}
let height = Math.floor(obj.bbox[3])
if(height>MAX_HEIGHT){
height = MAX_HEIGHT
}
const text = obj.class
images.push({
input: `${rectanglePrefix}${idx}.png`,
top: Math.floor(x),
left: Math.floor(y)
});
await createRectangle(x, y, width, height, text, idx);
}
await composite(images,finalFileName)
}
execute().then(()=>{
const value = {
observedState: state,
rawData: {
finalFileName: finalFileName
}
};
send(null, value);
});
Again, you can simply add this plugin by first downloading the exported plugin from here and then uploading it to your TinyAutomator so that you don’t have to configure it yourself.
Posting image to Slack
This part is optional. If you don’t have a Slack account you can skip this step.
First, you have to setup a Slack app that will send the images. Directions for this can be found here. During the creation of your app you should have generated an access token. You’ll need that token to authorise the sending of the messages. You can store that token in the vault of TinyAutomator.
Click on ‘add setting’. Fill in ‘slackAccessToken’ in the field ‘key' and paste your access token in the field 'value’.
This way the key is stored in an encrypted vault. Later on you can access the token without having to paste the token in your template.

Accessing the vault on TinyAutomator.
After the app has been set up, we have to create the plugin which will actually send the message using Slack’s REST API.
Note: There already exists a plugin to send a message to Slack. But in this case, we want to send a file, which requires a separate plugin.
This plugin requires three arguments:
- The Slack access token you generated for your app
- The Slack channel name where you want to send the file to
- The name of the file (picture) you want to send
//
const FormData = require('form-data')
const fs = require('fs-extra');
const axios = require('axios');
const { channel, accessToken, fileName} = options.requiredProperties
async function execute () {
if (!accessToken || !channel || !fileName) {
return send(new Error('Missing property'))
}
try {
const stream = fs.createReadStream(fileName);
const form = new FormData();
form.append('file', stream);
form.append('channels', channel);
let headers = form.getHeaders();
const response = await axios.post('https://slack.com/api/files.upload',
form,
{ headers: { Authorization: `Bearer ${accessToken}`, ...headers } })
send(null, { observedState: 'Success', rawData: { response: response.data } })
} catch (error) {
console.error(error)
send(null, { observedState: 'Error', rawData: { errorMessage: 'Error posting to slack api: ' + error } })
}
}
execute()
Similar to the other plugins you can download the plugin here and import it to TinyAutomator.
Posting image to Discord
If you don’t have a Discord account, you can create one for free and you’ll have access to (almost) all functionality. This is contrary to Slack, as the free version of slack doesn’t give that many options.
Sending a file to Discord also requires a new plugin.
First you’ll have to choose or setup a server where you want to send the picture to. Then you need to choose the text channel you want to send the picture to and copy the channel ID. This is done by first enabling developer mode in Discord and then right clicking on the channel and selecting ‘copy ID’. You’ll need that for the plugin to know which channel to send it to.


1 / 2
Once you’ve done that, you’ll also have to create a discord app with its own bot. A tutorial for that can be found here. During the creation of your bot you should have generated and saved a bot token. You’ll need that token to authorize the sending of the message. As with the access token for Slack, you can store the bot access token and channel ID in the vault on TinyAutomator. Head over to the vault (see the previous step) and add two encrypted settings:
- key: discordAccessToken, value: <your_token>
- key: discordChannelID, value: <your_channel_ID>
Next up you’ll have to create/upload the plugin that’ll send the message.
The plugin will (similar to the Slack plugin) have three required arguments:
- Discord access token: the one you generated while creating your bot
- Filename: the name of the file you want to send
- Channel: the ID of the channel you want to send the picture to
//
const FormData = require('form-data')
const fs = require('fs-extra');
const axios = require('axios');
const { channel, accessToken, fileName} = options.requiredProperties
async function execute () {
if (!accessToken || !channel || !fileName) {
return send(new Error('Missing property'))
}
try {
const stream = fs.createReadStream(fileName);
const form = new FormData();
form.append('files', stream);
let headers = form.getHeaders();
const response = await axios.post('https://discord.com/api/v9/channels/'+channel+'/messages',
form,
{ headers: { Authorization: `Bot ${accessToken}`, ...headers } })
send(null, { observedState: 'Success', rawData: { response: response.data } })
} catch (error) {
console.error(error)
send(null, { observedState: 'Error', rawData: { errorMessage: 'Error posting to slack api: ' + error } })
}
}
execute()
As with the other plugins, you can download and upload them from here.
Configuring the MQTT broker
More information on how data ingestion with MQTT works on waylhere.ay can be found here.
The python script is currently sending data, but TinyAutomator isn’t reading it yet. This is done in the ‘data ingestion’ tab. Here we’ll set up an MQTT broker subscription.
- Integration name: images (or anything else this will be the name of the integration shown in console)
- Topic: Sensors
- Connection string: mqtt://mosquitto
- Resource property name: resource
- Client ID: client
- Port: 1883
The remaining fields can be left empty. After this is done you should see a new configured integration:
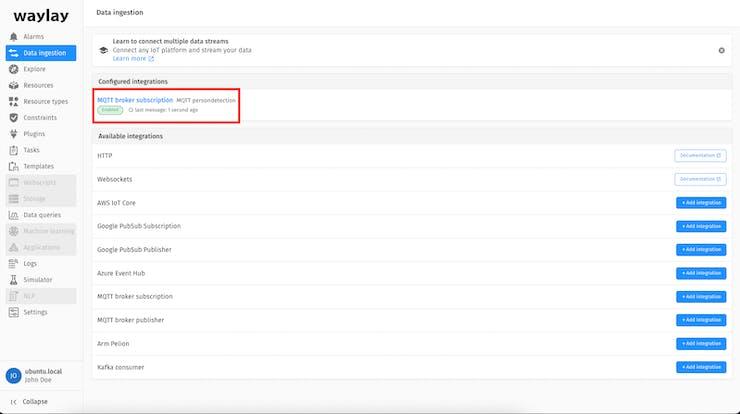
If you click on that and then move in front of the motion sensor you should receive a message that looks something like this:

Great! Now the data can be used in a template.
Creating the template
More information on how templates work on waylay can be found here.
Now that all the plugins have been made we can create the template on Tiny. A template is a definition of a processing flow. It will be triggered by incoming data on the MQTT broker. It will read the file name and state of the motion sensor. Next it’ll use the plugin for object detection (which we uploaded in the previous steps). Based on the classification result we will call a script which checks if the detected object is a person, and if it is we’ll mark the person on the image with the second plugin. After that we’ll send the image with the marked objects to Slack and/or Discord using the third plugin. The template looks like this:
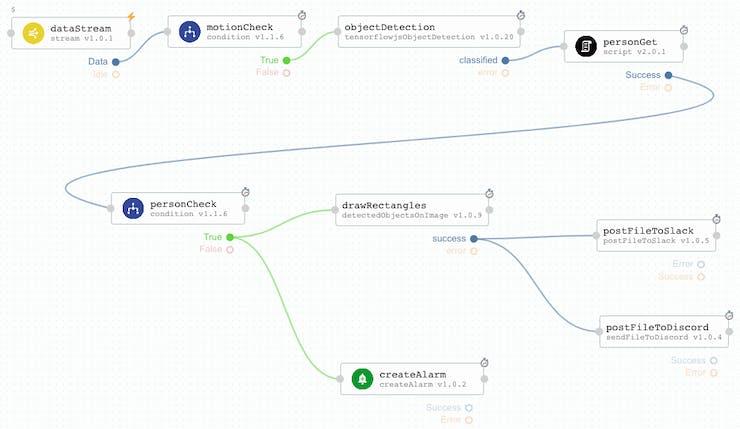
As with plugins, you can upload a template from your PC (download template).
If you are using the Slack plugin, you can edit the node and change the channel to the one you want. In this template it's configured to #bot
Creating a task
More information on how templates work on waylay can be found here.
We’ve created the template, but currently it does nothing as nothing is calling it. To use a template we have to create a task. This will be bound to the stream of data we’ve configured two steps ago.
You’ll have to create this task yourself, as tasks (as of now) can’t be exported or imported.
Click ‘Add task’
A configuration menu pops up:
- Name: the name of the task, you can choose it yourself
- Template: the template the task should use, in this case the one we just created
- Resource: the name of the resource, you can choose the one you created in the dropdown menu
- Tags: optional, we don’t need them right now
- Type of task: click on ‘reactive’ as it should be triggered on incoming data
At last click ‘create task’.
That’s it! If you now move in front of the sensor, there should be a message in Slack and/or Discord with the picture attached to it.


1 / 2
PART IV: THE CONCLUSION
We’ve created quite a powerful automated intrusion detection system using an existing object detection model and Waylay TinyAutomator. This project can also be customized to your needs. If you want to use this detection system outside and want to detect motorcycles for example, you can just let it take pictures periodically and filter out motorcycles instead of persons.
Republished from hackster.io with permission from the author.


'%3e%3cg id='Final-Copy-2_2_' transform='translate(1275.000000, 200.000000)'%3e%3cpath class='st0' d='M7.4,12.8h6.8l3.1-11.6H7.4C4.2,1.2,1.6,3.8,1.6,7S4.2,12.8,7.4,12.8z'/%3e%3c/g%3e%3c/g%3e%3c/g%3e%3cg id='final---dec.11-2020'%3e%3cg id='_x30_208-our-toggle' transform='translate(-1275.000000, -200.000000)'%3e%3cg id='Final-Copy-2' transform='translate(1275.000000, 200.000000)'%3e%3cpath class='st1' d='M22.6,0H7.4c-3.9,0-7,3.1-7,7s3.1,7,7,7h15.2c3.9,0,7-3.1,7-7S26.4,0,22.6,0z M1.6,7c0-3.2,2.6-5.8,5.8-5.8 h9.9l-3.1,11.6H7.4C4.2,12.8,1.6,10.2,1.6,7z'/%3e%3cpath id='x' class='st2' d='M24.6,4c0.2,0.2,0.2,0.6,0,0.8l0,0L22.5,7l2.2,2.2c0.2,0.2,0.2,0.6,0,0.8c-0.2,0.2-0.6,0.2-0.8,0 l0,0l-2.2-2.2L19.5,10c-0.2,0.2-0.6,0.2-0.8,0c-0.2-0.2-0.2-0.6,0-0.8l0,0L20.8,7l-2.2-2.2c-0.2-0.2-0.2-0.6,0-0.8 c0.2-0.2,0.6-0.2,0.8,0l0,0l2.2,2.2L23.8,4C24,3.8,24.4,3.8,24.6,4z'/%3e%3cpath id='y' class='st3' d='M12.7,4.1c0.2,0.2,0.3,0.6,0.1,0.8l0,0L8.6,9.8C8.5,9.9,8.4,10,8.3,10c-0.2,0.1-0.5,0.1-0.7-0.1l0,0 L5.4,7.7c-0.2-0.2-0.2-0.6,0-0.8c0.2-0.2,0.6-0.2,0.8,0l0,0L8,8.6l3.8-4.5C12,3.9,12.4,3.9,12.7,4.1z'/%3e%3c/g%3e%3c/g%3e%3c/g%3e%3c/g%3e%3c/svg%3e) Privacy Choices
Privacy Choices