


Parking occupancy detection and car counting analytics
Using a Raspberry Pi and web camera, do periodic photo capture of cars on the parking and store the car count in the database
Things used in this project
Hardware components


Software apps and online services
Waylay TinyAutomator

Story
Intro
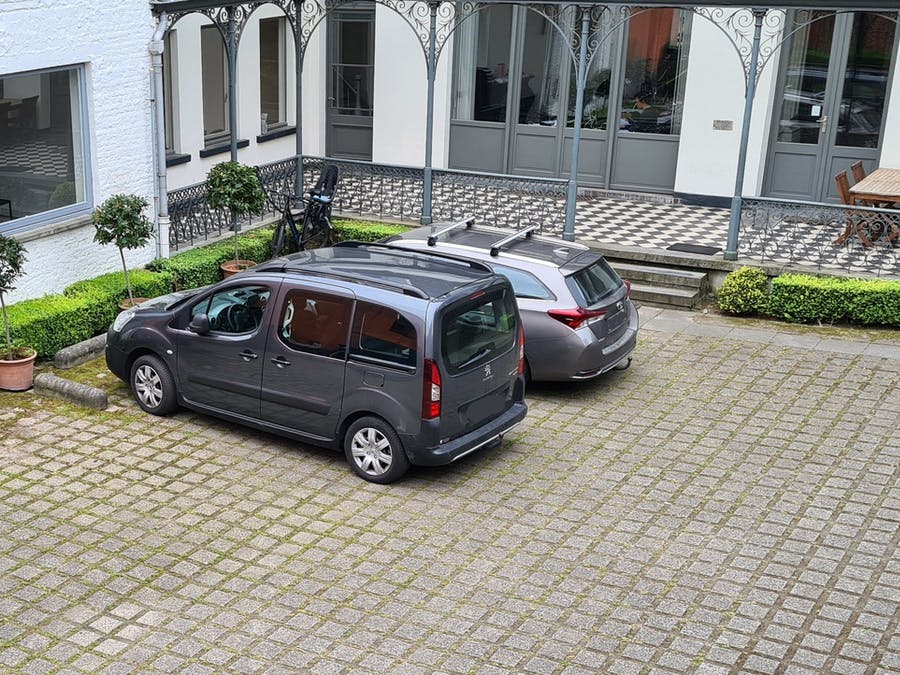
Car park occupancy is one of the topics that is discussed a lot in the Smart Cities domain. First things first: you need to get data about existing car parking occupations. That can lead to some expensive systems with a lot of sensors, detectors, connections, etc.. But what if you can grab a cheap device (yeah, you can use some hype words like Edge device ;) ) and just try to use some web camera to capture images from your window periodically, do image recognition and then store the recognized number of cars on some time series database. You can say: “I should have some data science skills, Python, database access, write some data visualization code, maybe use some cloud services to store that data, …”
But actually you can do it with some basic knowledge of Javascript using the latest technologies on your Edge device. And all processing happens on that device without a need to contact the cloud services.
The goal
Using a Raspberry Pi and USB web camera, perform periodic photo capture of parking space, recognize the number of cars in parking, store that number on a time series database and have some view on that time series data.
The solution
First you need to have a car detection TinyML model based on pictures of a car parking. But luckily recently I found a blog post Car Parking Occupancy Detection Using Edge Impulse FOMO which has a publicly available EdgeImpulse project which can be imported to your EdgeImpulse account. So we will be using that model to do the car detection in our case.
Second, you need to have an image capturing/streaming service. For that we will use a simple shell script which captures the images using fswebcam utility, saves them to filesystem and sends an MQTT message to the TinyAutomator Mosquitto MQTT server with a filename.
We will generate a docker container with that shell script, so it can be run together with TinyAutomator docker containers. Image files will be shared via docker engine volumes.
And as a last step, will create an image classification Waylay Sensor, which will use the EdgeImpulse SDK to perform car recognition, and use that sensor to perform storage to TinyAutomator time series storage.
Data visualization is already part of TinyAutomator, we will immediately see the parking occupation over time.
Software setup
Installing Waylay TinyAutomator
There is a nice article on hackster.io about the installation of TinyAutomator. You can follow the steps described in that article: Edge Computing with TinyAutomator in Industrial Applications
Installing the dependencies to run Edge Impulse
Register for a free account on the Edge Impulse platform here. Follow EdgeImpulse Raspberry Pi installation instructions.
Importing the TinyML Model
Login to your EdgeImpulse account. From a blog post mentioned earlier use the link to the public EdgeImpulse project https://studio.edgeimpulse.com/public/90393/latest in the browser and click “Clone this project” button. That will create a duplicate project on your own account, so you will be able to download and use it on your Raspberry Pi.
Connecting the device
To connect the Raspberry Pi to the Edge Impulse project, run the following command in the terminal:
If you have previously used your device in the past for other Edge Impulse projects, run the following command to reassign the device to a new project:
If you have only one active project, the device will be automatically assigned to it. If you have multiple Edge Impulse projects, select in the terminal the desired one.
Give a recognizable name to your board and press enter.
Your board is now connected to the Edge Impulse project and you can see it in the connected devices panel.
Deploying the model on the Raspberry Pi
To run the inference on the target, use the following command:
and select the project containing the model you wish to deploy.
Once the model downloads, access the URL provided in your serial monitor to watch the video feed, in a browser. If you point the camera attached to the RaspberryPi to the parking place it should start recognizing cars on it. By this step you are ready to integrate with TinyAutomator for further processing.
You should also download and store the tinyML model on RaspberryPi for integration.
That will save cars.eim file on Raspberry Pi filesystem and you will need it to put to the docker shared volume.
Creating the image streaming container
A simple shell script that can be used to capture images periodically and send a message to MQTT broker of TinyAutomator:
As you can see captured files are cleaned on timely bases and not sent over MQTT, so they are not available publicly, keeping them private on local folders.
A Dockerfile that can be used to create a docker image:
You can build docker container and push it to hub.docker.com, but there is already one which I pushed to our public repository: waylay/tinyautomator-streamer:latest
Adding image streaming service to TinyAutomator
TinyAutomator is actually a composition of docker services that are started using docker compose file. So you just add additional docker service to the tinyautomator-raspberrypi.yml file which defines/runs TinyAutomator services. Following changes should be done:
- Add shared volume for image files in volumes section of tinyautomator-raspberrypi.yml:
- Add streaming service definition and adjust settings according to your camera. In my case the USB camera is attached to /dev/video1, if you use a RaspberryPi Camera it will use /dev/video0. Keep in mind that you should map your existing /dev/videoxxx devices to docker container. Also you can set DELAY to some other value. It is number of seconds between two image snapshots :
- Also adjust the sandbox service definition in tinyautomator-raspberrypi.yml file to mount files volume inside sandbox container:
- Restart tinyautomator services:
- Check stream service log files. You should see log lines with message “took picture”:
- Also you should see files appearing in tinyautomator-files volume:
Point your camera to the parking place ! ;)
Creating a Waylay Sensor for image classification
Now you can go for next step and create a Waylay sensor - a Javascript NodeJS code which will use edgeImpulse NodeJS SDK (https://docs.edgeimpulse.com/docs/edge-impulse-for-linux/linux-node-js-sdk) to perform image classification which will bring as result the recognized object (cars in our case). There is a documentation at https://docs.waylay.io/#/features/plugins/ which explains how to develop a sensor plugin. Here is the code of the plugin which will do image classification. The link to the uploadable plugin via TinyAutomator console is here https://github.com/waylayio/tinyautomator-demo/blob/main/edgeimpulse/edgeImpulseFoto.jsonand you can upload it using TinyAutomator web console in the “Plugins” section.
The sensor has two input parameters - modelfile (file which we downloaded using edge-impulse-linux-runner utility before) and an inputfile - the path to the captured image. Code is quite simple: it initializes the EdgeImpulse LinuxImpulseRunner object, resizing the image according to the model parameters (required image height/width of the model), does image classification and send result in JSON format back to the TinyAutomator engine, so it can be used in the further processing steps in TinyAutomator template. Here is the Javascript code:
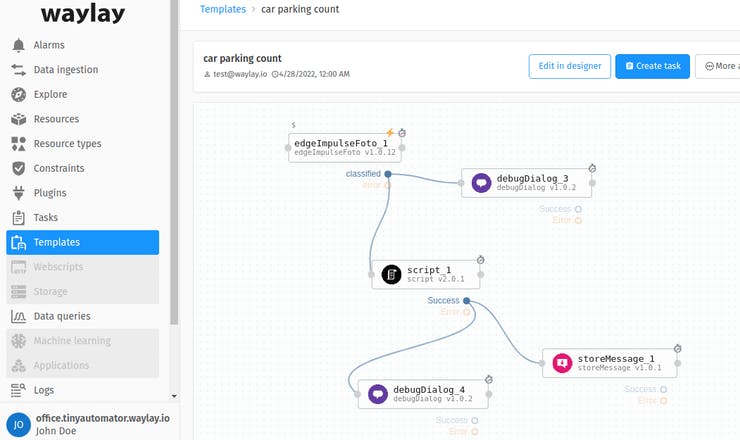
Creating a TinyAutomator template for storing the discovered number of cars
On TinyAutomator we need to create a template. Template is a definition of a processing flow. It will be triggered by incoming stream data on the MQTT broker. It will read the incoming file name, call a EdgeImpulseFoto sensor which we uploaded in previous step for objects recognition, based on classification result we will call a script sensor to calculate number of cars returned by classification and call storeMessage sensor to store current number of cars on a TinyAutomator resource(digital twin) which we will create and name it “parking1”. Last two sensors already exist on TinyAutomator out of the box. Here is the link to the template file https://github.com/waylayio/tinyautomator-demo/blob/main/edgeimpulse/carParkingTemplate.json . You can upload it using the TinyAutomator web console in the “Templates” section.
Copy EdgeImpulse model file to the docker volume
The downloaded cars.eim EdgeImpulse tinyML model should be copied to the tinyautomator-plugins volume as that one will be used by processing template. It also should be made executable:
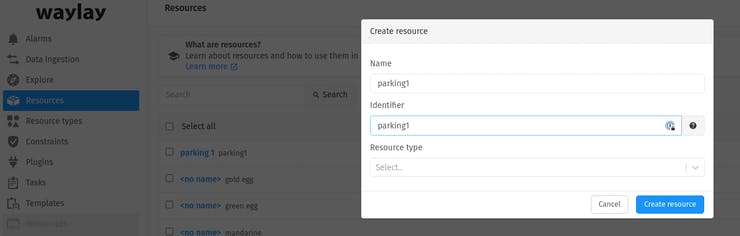
Go to TinyAutomator console and create a resource named “parking1”
Create a data ingestion for MQTT channel
Via the “Data Ingestion” section on TinyAutomator console create a connector for image files streaming.Use “MQTT Broker Subscription” integration and configure it with following parameters:Integration name: Mqtt (but can be named whatever you like)Topics: streamConnection string: mqtt://mosquittoResource property name: resourceClient ID: test-clientPort: 1883
Other parameters can be left empty. Once it is created and enabled you should see data coming from image streaming service:

Also the “stream” resource will be auto created. You can check it in the “Resources” section of TinyAutomator console.
Create a task
Go to the “Tasks” section of TinyAutomator console and create a task with following parameters:Name: car park countTemplate: choose “Car parking count” (that one was uploaded in one of previous steps)Resource: select “stream” from drop-downType: click on “Reactive” button
Click on “Next” button and fill modelname variable with value “cars.eim”
Click the “Create task” button. You should see the task start to work. You can check the log file of the task.

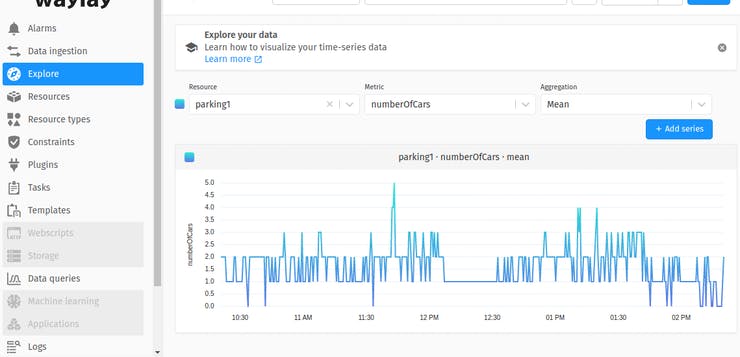
Visualization of time series data
Once task starts to work the recognized number of cars will be stored in a time series database of TinyAutomator for resource named parking1 (this is configured in “car parking count” template as parameter for “storeMessage” sensor)
If you go to that resource and check the “data” section you will see the stored data lines.
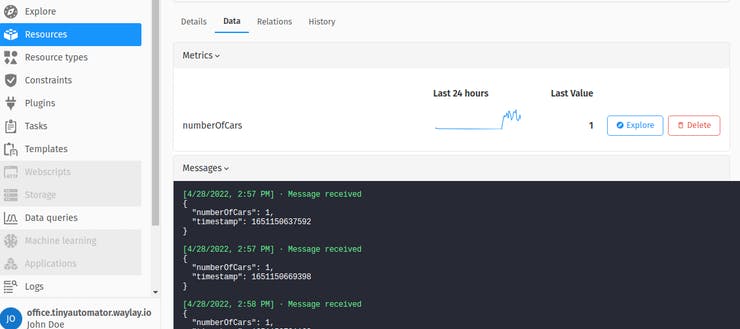
And you can also quickly explore it using the “explore” button.
Conclusion
You can easily do some simple and powerful automations using existing low code/no code solutions like EdgeImpulse ML and Waylay TinyAutomator just in a matter of hours. If you need help in deploying this solution or building something similar please contact Waylay.io for the low-code IoT Solution.
Code
tinyautomator edgeimpulse demo


'%3e%3cg id='Final-Copy-2_2_' transform='translate(1275.000000, 200.000000)'%3e%3cpath class='st0' d='M7.4,12.8h6.8l3.1-11.6H7.4C4.2,1.2,1.6,3.8,1.6,7S4.2,12.8,7.4,12.8z'/%3e%3c/g%3e%3c/g%3e%3c/g%3e%3cg id='final---dec.11-2020'%3e%3cg id='_x30_208-our-toggle' transform='translate(-1275.000000, -200.000000)'%3e%3cg id='Final-Copy-2' transform='translate(1275.000000, 200.000000)'%3e%3cpath class='st1' d='M22.6,0H7.4c-3.9,0-7,3.1-7,7s3.1,7,7,7h15.2c3.9,0,7-3.1,7-7S26.4,0,22.6,0z M1.6,7c0-3.2,2.6-5.8,5.8-5.8 h9.9l-3.1,11.6H7.4C4.2,12.8,1.6,10.2,1.6,7z'/%3e%3cpath id='x' class='st2' d='M24.6,4c0.2,0.2,0.2,0.6,0,0.8l0,0L22.5,7l2.2,2.2c0.2,0.2,0.2,0.6,0,0.8c-0.2,0.2-0.6,0.2-0.8,0 l0,0l-2.2-2.2L19.5,10c-0.2,0.2-0.6,0.2-0.8,0c-0.2-0.2-0.2-0.6,0-0.8l0,0L20.8,7l-2.2-2.2c-0.2-0.2-0.2-0.6,0-0.8 c0.2-0.2,0.6-0.2,0.8,0l0,0l2.2,2.2L23.8,4C24,3.8,24.4,3.8,24.6,4z'/%3e%3cpath id='y' class='st3' d='M12.7,4.1c0.2,0.2,0.3,0.6,0.1,0.8l0,0L8.6,9.8C8.5,9.9,8.4,10,8.3,10c-0.2,0.1-0.5,0.1-0.7-0.1l0,0 L5.4,7.7c-0.2-0.2-0.2-0.6,0-0.8c0.2-0.2,0.6-0.2,0.8,0l0,0L8,8.6l3.8-4.5C12,3.9,12.4,3.9,12.7,4.1z'/%3e%3c/g%3e%3c/g%3e%3c/g%3e%3c/g%3e%3c/svg%3e) Privacy Choices
Privacy Choices